Monday, November 8, 2010

WE'VE MOVED!

Hello Nextag Merchants!

We've MOVED! Please visit us at our new location - the new and improved Merchant Blog. Actually, it's more of a help center with a wide variety of resources to help you navigate all the merchant programs that are accessible right from your seller dashboard. Read blog posts, download help documents, stream video tutorials and more!  Don't wait, check out Nextag's Brand New Merchant Help Center NOW!


Tuesday, March 30, 2010

NexTag Takes its Buyer Review System to the Next Level!

We’ve just improved our Buyer Review Survey and added a new Post-Sale Survey – both with the features you’ve been asking for!

Why is this important to you?

A recent e-commerce persuasion poll carried out by Webcredible revealed that almost one third (28 per cent) of online shoppers are most likely to be persuaded to make an online purchase by the reputation of the retailer.

The new NexTag Buyer Surveys allow you to:

- Receive alerts if you achieve a rating below a certain number of stars. Now you know immediately if you’ve received a sub-standard review.


- Choose from a list of pre- and post-sale questions – we make it easy for you by having pre-selected questions from which to choose.


- Customize questions about the pre-sale or post-sale experience. What questions do you have about why your customers choose you? What is important to your customer? What sets you apart from other merchants who sell similar goods?


- Preview your surveys before they are implemented to make sure that they include the questions you want answered and look the way you’d like them to look

 - Automatically email post-sale surveys to customers at the time interval you specify


- Analyze the data that you receive from the surveys to help improve not only your NexTag campaign, but your entire site experience


How Do I Get Started?

Once you log into your account, you can find these surveys in your dashboard under “Buyer Feedback” – on the bottom right-hand corner of your dashboard.

 Both surveys are easy to implement. Just include a few lines of HTML code on your sales confirmation page, and the surveys will appear after purchases.

If you have any questions, please feel free to contact sellersupport@nextag.com.


Follow NexTag on Twitter or Facebook to receive updates on new features and learn about strategies that can help increase your ROI

Friday, February 26, 2010

ROI Reporting Explained

ROI Reporting Explained

We wanted to follow up our last blog about the ROI Optimizer and explain ROI reporting - what each report column displays and how the data within each is calculated.  The more you understand these reports and the data each contains, the better you should be able to manage your account.

A little background:

The ROI Optimizer is a pixel placed on your sales confirmation page; it relays sales data from leads originating from NexTag.com.  NexTag calculates the costs of leads and combines that information with your sales data, providing you with comprehensive reporting.  ROI reporting paints a complete picture of your campaign – at a high level, or as granular as the product level.


What the ROI reporting columns look like:


An explanation of the columns:


Column    Description
Date    The date
Clicks   The number of clicks (leads sent to your site) on a given date
CPC Rate ($)The average CPC rate that you are paying per lead or click
Fee ($)The amount spent per day (clicks x CPC rate) by your NexTag account
No. of Sales The number of sales you received on a daily or monthly basis (You can click on the number to see exactly what was sold, the time of the click out, and the time of the purchase.)
Sales Total ($)Total revenue for the day or month
% MktgCost of marketing, also known as cost of sales (fees/sales total); the percentage of your total revenue from NexTag that is spent on advertising with NexTag
% ConvTells you the percentage of sales you are getting from clicks (clicks/no. of sales)
Cost Per OrderThe cost in click fees to acquire one sale (fee/no. of sales)
AOSAverage Order Size, or the average amount of a sale through NexTag (sales total/no. of sales)


Each of the NexTag reports provides you with the above statistics.  As always, if you have any questions, please feel free to contact Seller Support


Tuesday, February 2, 2010

Maximize your NexTag performance with the ROI Optimizer

The ROI Optimizer is one of the most important features that you can implement to understand the performance of your account.

What is it?

The ROI Optimizer is a pixel placed on your sales confirmation page; it relays sales data from leads originating from NexTag.com.  NexTag calculates the costs of leads and combines that information with your sales data, providing you with comprehensive reporting that includes: cost of marketing (COS), conversion rate, average order size, cost per order, total fees, and total revenue.  ROI reporting paints a complete picture of your campaign – at a high level or as granular as the product level.

How do I install it?

To find instructions on how to install the ROI Optimizer, simply:
1)    Log into your NexTag account
2)    Click on “Implement ROI Optimizer” – the last link under Account Management
3)    Select the ROI Optimizer you wish to install: Standard, Lite or Advanced (Standard is recommended)
4)    Follow the instructions on the page

What reports will you be able to access?

View Clicks By Date

View Clicks By Date shows you high-level account performance on a daily, weekly, monthly, or quarterly basis.  Select your desired date range and view up to three months of data.

View Clicks By Product
This report displays top clicked-on products and their associated ROI.  Use this report to see if your high-traffic SKUs are converting.

View Sales from NexTag
This report provides you with sales data from NexTag, including the time of the click out, the time of the purchase, and the amount of the sale.

Manage Bids by Product
Use this tool to set or change CPC rates and view product sales data like revenue and conversion rates. You can also search products by keyword.

Manage Bids by Category
You can search here by category to find associated sales, sales revenue, and conversion rates; you can also view and change CPCs and add a marketing message or logo.

Through these reports, you can identify – from the account level all the way down to the product level – which products/categories are performing well and may benefit from a bid increase.  You can also identify products you might want to keep at the category minimum.

As always, if you have any questions, feel free to contact sellersupport@nextag.com.

The NexTag Team

Wednesday, January 20, 2010

New Features on NexTag

NexTag has upgraded your Product Shopping Seller Dashboard, which now offers two new reports in addition to greater flexibility in the existing reports and tools within your dashboard.


Your upgraded dashboard includes a new Clicks by Category report, which provides information on click statistics (including ROI data, if you have provided it to us) by category. We have also introduced a new Bidding History report to help you track changes in your category and product bids.


Additionally, we have improved our existing reports and tools by letting you view up to 3 months of data at a time. We have also enhanced sorting capabilities to allow you to sort data by any column within a given report.

If you have any questions, please email us at sellersupport@nextag.com. We greatly appreciate your business.

Best regards,
The NexTag Team

Wednesday, January 13, 2010

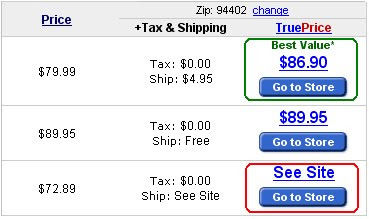
Improve The Quality Of Your Leads by Showing Your “True Price!”

What is a True Price?

The “True Price” is the final price of an item and includes tax and shipping.


How does the True Price help qualify your leads?

Let’s face it, customers factor in Tax and Shipping when looking for the best deal online.  Customers who know the final price of your items are more likely to complete a purchase when clicking to your site.  Inform your customers and improve the quality of your clicks! More qualified traffic leads to increased conversion while lowering your cost of marketing.


By showing customers your True Price, you can improve click quality and drive more sales! 


Without Tax and Shipping information, final prices are incomplete and unclear.  Your clicks are less likely to convert 
into sales. 


 Maximize your profits by providing the TruePrice up front!


Setting your Tax is fast and easy!
   1)  Log into your NexTag account.
   2)  Click on “Update Sales Tax" Information.
   3) Select all states where sales tax is applicable and hit ‘Submit’ when you are done.


Set your Shipping Rules within the dashboard

   1) Log into your NexTag account.
   2) Select “Manage Shipping Rules.”
   3) Select your method of shipping and hit ‘Submit’ when you are finished.


Tuesday, October 13, 2009

Announcing NexTag Canada


Do you ship to Canada? NexTag Canada is up and running and currently receiving traffic from thousands of Canadians. You can sign up with your US credit card, and send the same feed that you are currently sending to NexTag US. To make it even easier, if you write to Seller Support, they can convert your US prices to Canadian dollars for you! NexTag will display a message to shoppers that lets them know their order will ship from the US and that when they get to your site the prices will display in US dollars.

It is only $50 CAD to start a Canadian account, and remember that you can cancel the account at any time and have the remaining money in your account refunded to your card.

This is a great opportunity to grow your business with little time and effort needed on your part. If you have any questions at all, please feel free to contact seller support for further details.